
When discussing grading, there are a few techniques that I just can’t talk enough about. Pasting surfaces is one of those. It’s ironic (or annoying, I’m not sure) that this command is buried so deep within the program. See where to find it after the jump.
By the way…if you’d like to see how these techniques are applied along with many other grading techniques, please tune in to our EE Cast tomorrow “Get Smart: Intelligent Grading with Civil 3D”. You can register here.
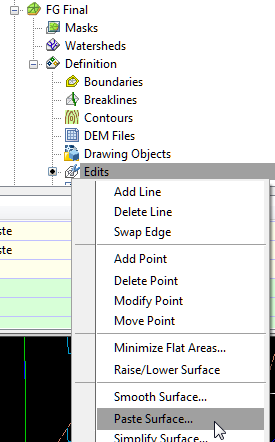
To paste a surface you have to expand the Definition node of the receiving surface to find the Edits node, right-click on it, and there it is…buried like a precious gem…the Paste Surface command.
This command affords you two powerful techniques. The first is the almighty “composite” surface. I often use this term to refer to a combination of EG and FG that yields a fictitious as-built surface. With this combination you can cut profiles or lay out pipe networks without having to worry about whether you’re within existing ground elevations or finished ground.
The second applies to grading and allows you to work in sections as you build a complex grading model. Instead of trying to grade Lots 1-12 as one big model, you can grade the lots individually and paste each one into a master FG surface.
Remember that the order that surfaces are pasted is important. If you paste surface B into surface A, the footprint of surface B will wipe out and replace any data in surface A. If you’re pasting multiple surfaces into a master, a similar concept applies.
Happy pasting!


You can also find the command under the Surfaces menu> Edit Surfaces > Paste Surfaces.
One thing I’d like to add from experience, you have to be very careful and know your surface boundaries for each surface being pasted. You can very easily create a fatal error situation by having overlapping proposed surfaces — so be aware.
Eric,
I want to thank you for and expand on the last tip. The order in which you apply operations to create a sufrace is often very important. I just had a surface (composed of a pasted corridor surface and breaklines from feature lines) that was creating multiple interior boundary gaps between the feature lines. It looked like swiss cheese.
I reversed the order in the definition tab of the surface properties, applying the feature lines first, then the pasted surface (sort of “starting inside, working out”), and VOILA! the gaps were filled in!
Thought I’d just share that little nugget with the class.