I am working on a series of posts to follow up on my AU Class. During the class, I made heavy use of Map 3D Tools (Civil 3D is built on Map 3D). Since Map 3D tools are often new to Civil 3D users, I’d like to take the time to get you “caught up”.
One of the first tasks you will probably run into as a civil firm is importing publicly available GIS data such as ESRI shapefiles (.shp), ArcInfo Exports (.e00) or similar.
In this post, I will explain how to import the file as AutoCAD entities. If you are interested in learning an alternative way to use this data through something called the FDO, read this article I wrote last year: Can You Do That In CAD?
Read more about importing shapefiles into your drawing after the jump:
Choose Map>Tools>Import
Locate your file and choose the appropriate format.
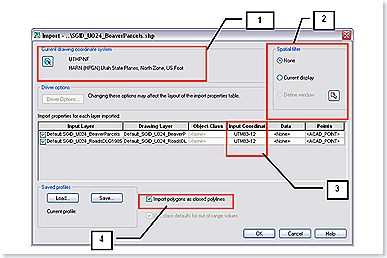
The Map Import Dialog will appear….
1. Current drawing coordinate system: Press this button to assign a coordinate system to the drawing your drawing.
2. Spatial Filter: Establish a spatial filter to bring in data in certain areas such as the currently displayed area of your drawing, or by defining a window.
3. Input Coordinates: This column indicates the coordinate system of your shapefile. If your shapefile contains a .prj file, this box will be populated for you automatically. If not, select inside this field to set.
4. Import polygons as closed polylines: For most uses, you will want to check this box so that closed areas, such as legal parcels, soil boundaries and similar, come in as closed polylines instead of AutoCAD polygons.
Right click on the data column and choose “Use Input Layer Name for Table Name”. This will bring in the “data” portion (such as road names, parcel information or other relevant goodies).
Click OK in the Map Import dialog, and Zoom Extents in your drawing to see the data.
The data can be viewed in the AutoCAD properties box.
My next post (probably later today) will show you how to use that Object Data (such as a road name) to make a Map Annotation Label. I used an Annotation Label in my AU class to automatically label my Map Topology.


![clip_image002[4]](http://www.civil4d.com/wp-content/uploads/2007/12/clip-image0024-thumb.jpg)

![clip_image002[8]](http://www.civil4d.com/wp-content/uploads/2007/12/clip-image0028-thumb.jpg)
![clip_image002[10]](http://www.civil4d.com/wp-content/uploads/2007/12/clip-image00210-thumb.jpg)
![clip_image002[12]](http://www.civil4d.com/wp-content/uploads/2007/12/clip-image00212-thumb.jpg)


[…] Civil 3D Fundamentals: Import an ESRI Shapefile (.shp) into Civil 3D […]
I created a 2008 flavor help doc to show how to connect to data sources with FDO in our shop. An enterprise GIS will likely have SDE as a store of data, and this paper shows how to do that as well…I’ll forward
Dana…Thanks for this series on Map3D, for many of us out in the wild, learning the map functions has been very problematic. Does anyone have a good third party book on AutoCAD map that they would suggest?
Brent, there’s no book out there yet but there may be one in the works one of these days. Maybe once the replacement for a certain AE in Alabama gets on board there may be more time to work towards this.
Dana,
I would like to use an expression for the tag value in annotations in Civil 3D. I want the value to combine to items that are looked up. I tried this expression (STRCAT :ST_NAME@Default_RoadCenterline” “:ST_TYPE@Default_RoadCenterline)
and it did not work. Does anyone have any other ideas that would help?
Bob