
I’ve always been had this strange fascination with the way Dana models parking lots with corridors. I bow humbly to her knowledge, methods and creativity, because I’ve never fully grasped the process. I have a slightly different approach to parking lots, using feature line grading to create the main outline and setting high/low points and setting the edge of pavement for my curb islands, then using projection grading to create the flowline of the gutters, face of curb, and back of curb. The methods of projection grading for the curb islands can be found in the AOTC Designing Intersections and Cul-de-Sacs book. To see details on how I grade my parking lots, follow the link.
First, we have to look at our area and set some ground rules. I’ve created a VERY generic parking lot that’s 200’x200′ and slopes at 5% from south to north. I’ve created some polylines that are at 0 elevation and represent the edge of pavement for my curb islands. I’m not here to apply a lot of design theory, but to illustrate some fairly general techniques that you may employ in your day-to-day job. Take what I give you here and build on it – this is one scenario, but the theory can be applied to many different situations. To better illustrate this process, I’ve created a FG composite surface that has my parking lot surface and my curb island grading group pasted into it. I’ll also offer some other intermediate tips and tricks to help you model the surface with more accuracy.
Let’s take a look at our design scenario – in the illustration below, which curb island better depicts the way the contours should look, left or right?
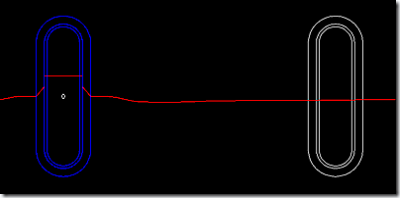
In case you didn’t hover over the image, the answer is the island on the left – the blue one. This shows how a contour should follow through a curb island. I’ll show you how to do the one on the right so that it works correctly as well.
First, of course, you need to have your geometry drawn. Elevation doesn’t matter that much with your geometry since you’re going to assign elevations from the surface during the feature line creation. So that’s what we’ll do first – convert that EP polyline on the right (the outer-most white polyline) into a feature line and assign elevations from our parking lot surface. To do this, go to the Grading menu and select Create Feature Lines From Objects. Now, select the polyline and hit enter. That will bring up the feature line creation dialog box, as shown below:

In this instance, I have assigned a style to my edge of pavement so it won’t be the generic looking feature line style. I’m choosing to erase the existing polyline and assign elevations to the feature line from my Parking Lot surface. Once you have yours selected, click OK to proceed.
If you select the newly-created feature line, you will see that we have an issue. You may not recognize it as an issue now, but it will be later on in the game. In the illustration below, you will see that we have only 4 elevation points on our feature line. The curve has an elevation, but it really needs more elevation points to be able to model correctly.

The easiest way to add the necessary points is to grab them from the surface – this is done by going to the grading menu, selecting Edit Feature Lines, and then picking Insert Elevation Point. Once you do this, two things are required – picking the point where you would like to insert the elevation point, and selecting the elevation for the point. It should be noted that the elevation defaults to the elevation of the surface at that point. Simply hitting enter after you pick the elevation points will cause the surface elevation to be selected automatically. To pick the elevation points on my curb island, I tend to use the midpoint osnap. I will snap to the midpoint of the curve, and from that point on, midpoint will snap between elevation points. You should end up with a feature line like the one shown below – the amount of elevation points that you select will be based on your experience as you get comfortable with the process.

OK, maybe I went just a bit overboard. You probably won’t need that many elevation points.
Once you get your edge of pavement feature line situated the way you want it, you should be familiar with grading criteria sets. To create my curb islands, I have created three new grading criteria. The first one is my flowline of gutter – in this one, I offset the feature line horizontally 18″ and vertically by a grade of 6%. The criteria for my flowline can be seen below:

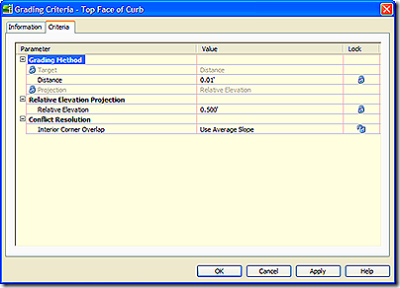
Next, I create my face of curb. For this one, I offset my flowline 0.01′ horizontally and 6″ vertically. I use the horizontal offset because Civil 3D does not like vertical faces. Having a horizontal offset even that small gives the face of curb just a little slope and makes the feature line behave. The criteria can be seen below:
Lastly, I create my top back of curb. To do this, I offset my face of curb 6″ horizontally with a relative elevation of 0. This is essentially the same as just doing a horizontal offset. The last criteria can be seen below:

Once the criteria are defined, we need to apply them through the Grading>Create Grading command. You can start off with the first one (flowline,) then immediately select the face of curb, then move on to selecting the back of curb. Once you finish, make sure you create a grading infill so that your volumes will work out correctly. Your new contour will look like this:

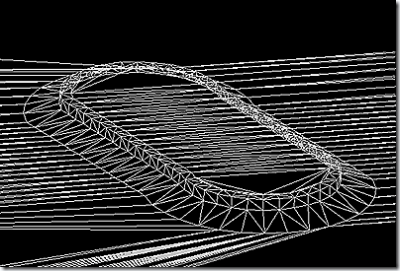
I’ve seen instances that created some really “jaggy” contours – to fix this, I’ve had to perform some surface smoothing. Search this site for how that’s done – it really helps make things look right. Below is an illustration of my curb island in 3D – hope yours turns out too!


Good stuff Jason. Save a few clicks by using the feature line tools to add intermediate grade points (by increment) _before_ assigning surface elevations to the feature lines. Saves a few steps and we’re all about that!
Mark
Nice article Jason, can’t wait to put your method to use on a good size lot.
I have been working with this method on a big site that I’m doing and experienced a lot of problems with overlapping grading objects around my curves. Do you know anything about this? I thought it was first due to the fact that my radiuses were not perfectly tangent with the tangent lines (Architects???). I corrected it and it helped in some cases but I still could not get rid of the errors. I like this idea better than any other idea that I have seen regarding parking lot design as long as I can figure out why I’m getting the errors.
Rick try using the stepped offset command from the feature line tool pallet (is the last icon on the pallet) instead of the grading criteria method then add your feature lines as break lines to your surface.
I tried doing this and did some thing wrong. I only get 0.22′ elevation diference between my flowline and top of curb.
If you’re adding feature lines as breaklines to your paving surface, it was mentioned by Ricky Rivera in his Grading a Commerical Site in Civil 3d 2008 class that you should add gutters as non-destructive breaklines and then add the back of curb as standard breaklines. That way the gutters don’t break-up the general slope of the top of pavement. He also suggested they be on separate layers so you could use the “select similar” and add each group of feature lines all at once.
L. Robbins, bee sure that you are entering the right value for the right promp. They are diferents options for the vertical diference. You can enter grede, slope, elevation or a variable. Be sure that if you are using .5′ elevation diference you are on the elevation option not on the grade or other one. Let me know if this work for you.