
Well, it’s good to be here. For anyone who has visited this site before and has not followed the link over there to my site, for shame! If you don’t know me yet, a little introduction – my name is Jason Hickey (as is pretty obvious by the name below this post…) I’m a Civil Applications Engineer for ALACAD, an Autodesk VAR located in Birmingham, Alabama. ALACAD is also an Autodesk ATC and a member of ADN. I came from the “real world”, with a background in surveying, civil design, network administration and CAD management. I hope to be able to offer a lot of insight into Civil 3D as it relates to these subjects. By the way, if you’re wondering, I’m the one in this group with the weird sense of humor 😉
Now, down to the reason you’re here – to learn! I’ve had to draw surveys before that called out information from points shot in the field – but who hasn’t? In the past, I’ve had to label things manually. What a pain…there should be an easier way. Well, good news, because there is!
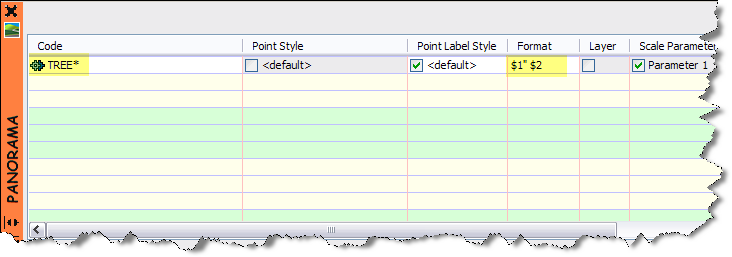
I’m going to use a tree for this example. We want to call out the size and species on all trees shot in the field. My crews will shoot the points and give them a description format as follows: TREE {tree diameter} {tree species} For example, a 48″ Oak tree would be coded TREE 48 OAK. I’d like it to show up on my drawing as follows:

The interesting thing to note about this illustration is that what we’re showing is a point! I’ve chosen a tree block for my point marker and labeled my point with the full description. I set that conversion up as a descriptor key, as shown below:
I created a lable style that labeled only the full description and played with the offsets to make it look as I wanted it to next to the tree. Here’s what that style looks like:

And once I import it, I don’t have to touch it, unless I need to drag the label somewhere. And it behaves just as a point would, because that’s what it is…
If you’d like to request a topic, email me. You can reach me here.
Have fun!

